Related Articles
Do you want to efficiently manage your purchase orders? Are you a seller of goods or services? Are you involved in purchase transactions of various sizes, which are difficult to manage?
Thanks to Odoo, you can create and manage orders in a well-regulated manner. Odoo is in high demand among businesses and business owners due to its powerful set of features, which makes managing purchase orders in Odoo simpler to use, but no less effective.

Definition Of Purchase Order In Odoo
A purchase order is a standard commercial document and an official offer that is provided by the buyer to the seller to control the purchase of goods and services. It indicates the product type, quantity, and agreed prices.
This guide will help you learn all the features of a purchase order in Odoo you need to know.
Creation Of Purchase Order In Odoo

After you have sent a Request for Quotation, you may click on the “Confirm” button to assign a Purchase Order (PO).
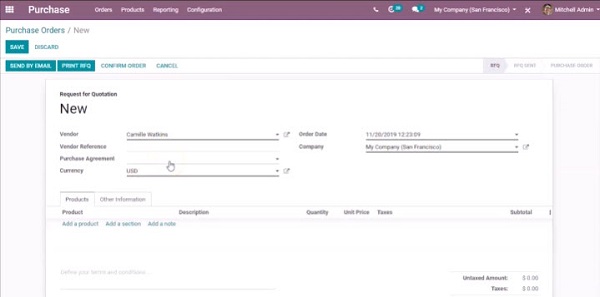
You can also create a PO as follows:
- Go to the purchase module and click “Create”
- Enter all the necessary information (Vendor, Order Date, etc.)
- Add the product data to the Product Line
- Also, Odoo users may click the “Other Option” tab to add some additional information if needed
- You can either send the request by e-mail or even print it
- To create a purchase order in Odoo just click Confirm Order. Ready!
- How To Manage Receipts In Odoo Purchase Order?
A receipt is a record of incoming deliveries in Odoo. If you need to manage the receipt in Odoo purchase order, follow these steps:
- After confirming the PO, you can notice the “Receipt” button in the upper right corner of the screen
- Click this receipt button, then click “Confirm”. You can also affirm it by clicking the “Receive Products” button in the PO page
- After that, press the “Print” button to print the picking operations, as well as the waybill
- How To Make a Vendor Bill In Odoo?
- After creating a purchase order, you can notice the “Create Bill” button at the top right corner
- Click on this button, and then click “Confirm”: as a result, the status will be changed to a paid one
- The created vendor bill will be displayed on the top of the definite PO
- Purchase Agreement in Odoo
A purchase agreement in Odoo is a legal document outlining various conditions related to the sale of goods and services. This creates a legally binding contract between two parties: the seller and the buyer.
The configuration for activating the Odoo Purchase Agreement (PA) is as follows:
- Go to the Purchase Module
- Select “Configuration”
- Go to Settings and activate the “Purchase Agreement” function
In order to create a purchase agreement in Odoo, follow these steps:
- Go to the purchase module, then click “Purchase”, after which you will see a drop-down list
- Select a Purchase Agreement from the list and click “Create”
- To create a purchase agreement, enter all the necessary information into the special fields, then click the “Confirm” button – the agreement will change its status to confirmed
- Click on the validation button
- After successful validation, you can notice the “RFD / Order” button in the upper right corner of the screen, it will go into the Bid selection status
- Click on the “RFD / Order” button, then confirm the appropriate RFQ and cancel the other RFQs
- Go back to the Purchase Agreement, then click Close
There are two possible types of agreement:
- Blanket Orders are an order type that customers place to allow multiple delivery dates over a certain period of time.
- Call For Tender is the type in which the client sends the Request for Proposal to several suppliers at once and selects the one whose price suits him best.
Any Questions?
We hope this guide has been helpful to you. You can leave feedback in the comments below. If you still have any questions regarding the functionality of Odoo, feel free to contact us.


